With the increasing need for modern and technically advanced blockchains, Hyperledger Fabric has emerged as a robust, open-source, and permissioned blockchain framework integrated with unique identity management and access control features. Because of these attributes, Hyperledger fabric is widely adopted for a range of industry applications, such as building highly feasible dApps and enterprise-grade decentralized solutions for industries spanning Web3, banking, supply chains, DeFi, trading finance, and more.
If you are planning to deploy your blockchain application on the Hyperledger Fabric ecosystem to leverage its underlying technologies, you will need a distributed Hyperledger network on any on-premise or cloud infrastructure. This guide talks about deploying the Hyperledger fabric network on Kubernetes, an ideal platform for blockchain deployment with a scalable and resilient dApps hosting infrastructure.
Deployed on Kubernetes, blockchain nodes and networks become easy to manage, scale, and orchestrate. Further, Kubernetes efficiently uses resources as per the network-specific system load, resulting in low cost and computing power to build and scale applications.
Now that you understand the fundamentals of Hyperledger Fabric and Kubernetes, it’s time to discuss the step-by-step deployment process of the network.
How to deploy a Hyperledger fabric network on Kubernetes
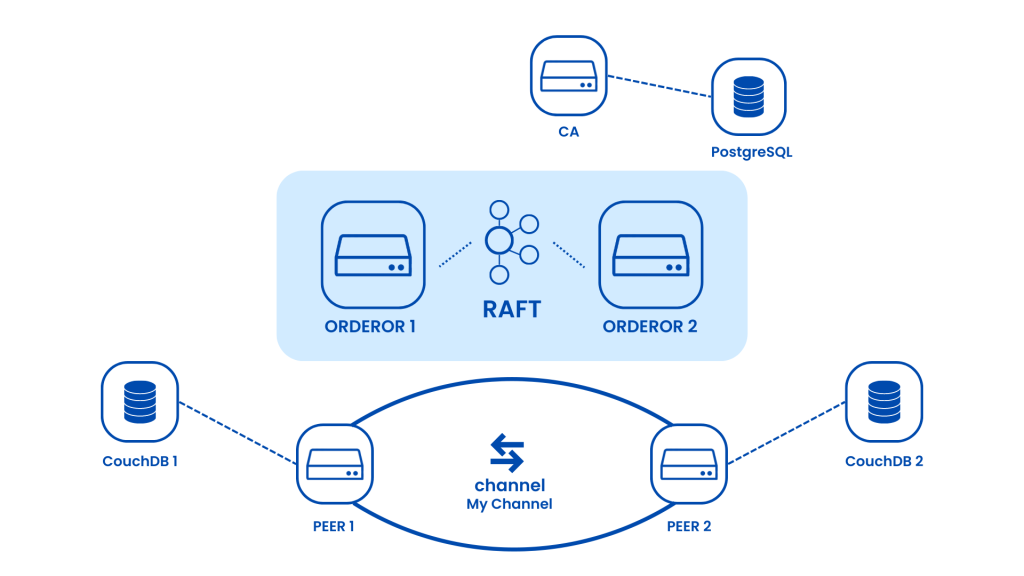
You will build the following:
Fabric CA
First, you will deploy a Fabric Certificate Authority, serviced by PostgresSQL, to manage identities.
Fabric Orderer
Next, you will deploy an Orderer service of various Fabric ordering nodes to establish consensus over the Raft cluster. This Fabric Ordering service enables consensus for development and production networks.
Fabric Peer
Finally, you will deploy several peers and connect them with a channel. We’ll bind the peers to a CouchDB database as described in the image below:
Prerequisites:
You need the following 3 things to deploy your Hyperledger Fabric network. Additionally, you must understand the containerization technology and how Kubernetes works:
- An up-and-running Kubernetes cluster.
- A domain name for your cluster.
- A repository with artifacts.
Once you have the cluster, install the Ingress controller. For this guide, we are using NGINX.
Deploying the Hyperledger Fabrics network on Kubernetes
Installing the Fabric CA Helm Chart.
Install the real Fabric CA Chart. Run the command Kubectl get pods to fetch the actual Pod that runs the CA. Then, run kubectl logs to see if the CA server is running. Use the following command:
helm install stable/hlf-ca -n ca -namespace blockchain -f./helm_values/ca_values.yaml

CA_POD=$(kubectl get pods -n blockchain -l "app=hlfca,release=ca" -ojsonpath="{.items[0].metadata.name}")

kubectl logs -n blockchain $CA_POD | grep 'Listening on'
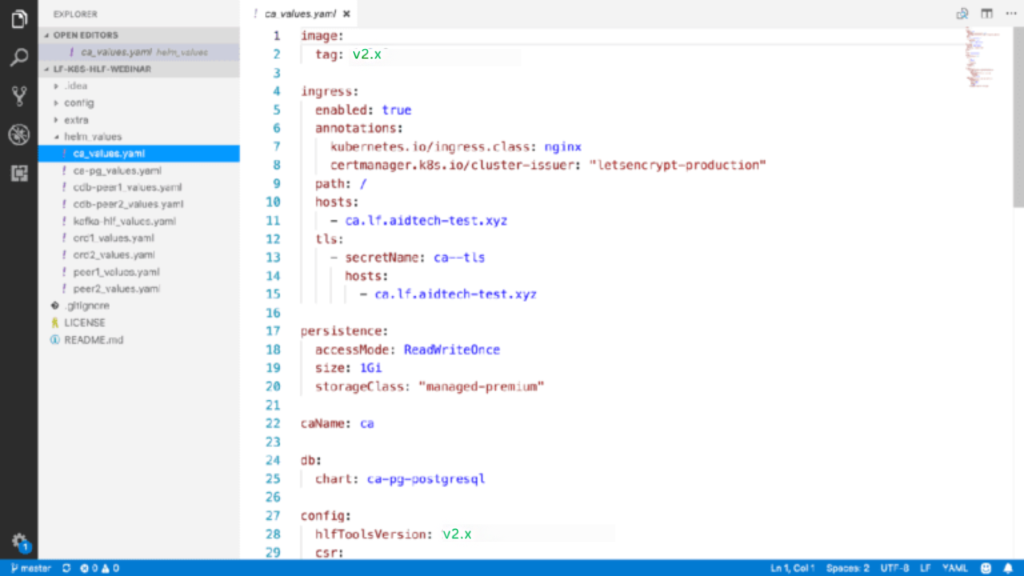
As you can see, the values for CA are more involved.
First, define the image tag where you use Fabric v2.x or v2.5. Also, implement an Ingress. This approach allows you to access the Certificate Authority outside the Kubernetes cluster.
Then, define the configuration settings, such as the version of the Hyperledger tools, which are customizable within one of the config maps in the chart. Config maps are Kubernetes abstractions that store values made available to the POD.
Note that you must also specify both the Certificate Signing request and an affiliation list, which will remain empty in the present scenario.
Lastly, add a Pod affinity once again. Ensured that our Fabric CA server is deployed on the same Kubernetes machine as our PostgreSQL server. Refer to the below images for better visualization:
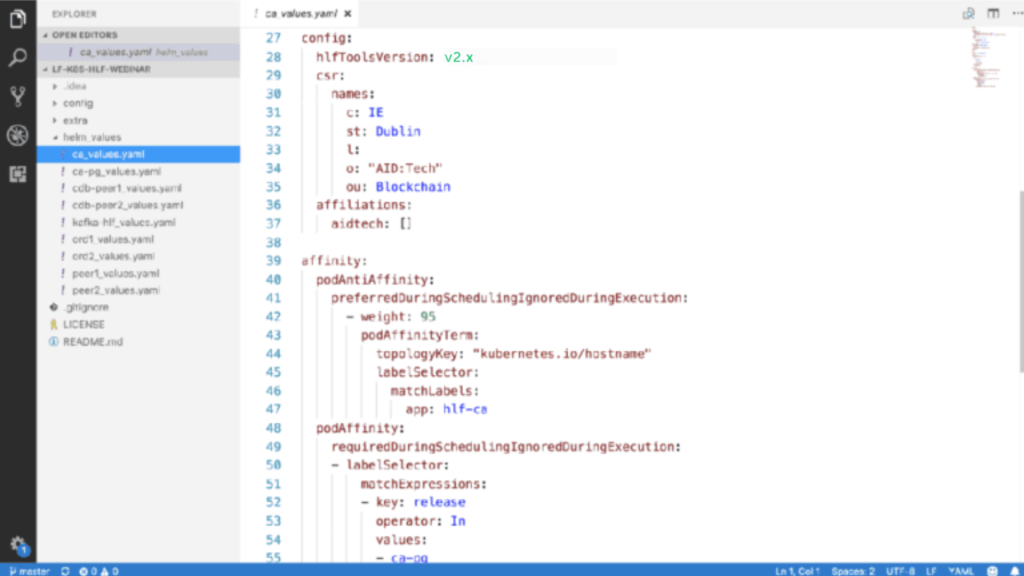
Generating the Fabric CA identity.
Once the CA starts running, enroll in the Fabric CA’s identity. To run the first command, use kubectl exec to check the existence of a certificate inside the folder of the Fabric CA membership service provider.
Done correctly, you can run the Fabric CA client enroll command in the CA, which points to the CA’s ingress. After this, you can run Kublect get ingress on your machine to obtain the Ingress connected to the Fabric CA service. This is the domain that we have talked about in the prerequisites.
With this setup, you can run the curl command and get the CA info. Remember that successful setup highly depends on the Certificate Manager setting up the TLS correctly. Hence, you may need to wait longer to get the setup working. Use the following command to run the curl command:
kubectl exec -n blockchain $CA_POD -- cat/var/hyperledger/fabric-ca/msp/signcerts/cert.pem

kubectl exec -n blockchain $CA_POD -- bash -c 'fabric-ca-client

enroll -d -uhttp://$CA_ADMIN:$CA_PASSWORD@$SERVICE_DNS:7054′

CA_INGRESS=$(kubectl get ingress -n blockchain -l "app=hlfca,release=ca" -ojsonpath="{.items[0].spec.rules[0].host}")

curl https://$CA_INGRESS/cainfo
Obtaining the crypto material
After setting up and installing your CA, you can transfer the certificate or the CA server to your machine using the Fabric CA Client binary. For example, if you’re using a Mac, use Homebrew to install it.
Next, use Kubectl exec to execute the register command within the Fabric CA, which registers the organization responsible for hosting the Orderers and the Peers.
Upon successful registration, you can use the Fabric CA client again to enroll in the identity and receive your private key and certificate. As this identity is the admin, we will run the following command to copy the certificate from signcerts into the admincerts folder.
FABRIC_CA_CLIENT_HOME=./config fabric-ca-client getcacert -uhttp://$CA_INGRESS -M ./AidTechMSP

kubectl exec -n blockchain $CA_POD -- fabric-ca-client register -id.name org-admin -id.secret OrgAdm1nPW -id.attrs 'admin=true:ecert'

FABRIC_CA_CLIENT_HOME=./config fabric-ca-client enroll -uhttp://org-admin:OrgAdm1nPW@$CA_INGRESS -M ./AidTechMSP

mkdir -p ./config/AidTechMSP/admincerts

cp ./config/AidTechMSP/signcerts/* ./config/AidTechMSP/admincerts
Saving crypto material to the Kubernetes
Provide the certificate of the encrypted authority for establishing a TLS connection and communicating with configured CA. That’s because the Fabric CA client verifies that the certificate presented during the connection matches the one associated with the CA server. As your applications will utilize both the certificate and key, you must employ a kubectl create secret generic command to include the file as a secret in the Kubernetes service:
ORG_CERT=$(ls ./config/AidTechMSP/admincerts/cert.pem)

kubectl create secret generic -n blockchain hlf-org-admincert-from-file=cert.pem=$ORG_CERT

ORG_KEY=$(ls ./config/AidTechMSP/keystore/*_sk)

kubectl create secret generic -n blockchain hlf-org-adminkey-from-file=key.pem=$ORG_KEY

CA_CERT =$(ls ./config/AidTechMSP/cacert/*.pem)

kubectl create secret generic -n blockchain hlf-ca-cert-from-file=cert.pem=$CA_CERT
Generating Genesis and Channel
You can now run the configtx Gen2. It is utilized twice within the two profiles created to generate a genesis block for the orderers and a chain of transactions for the peers. So, you have two Kubernetes secrets to store these items within the cluster.
cd ./config
configtxgen -profile OrdererGenesis -outputBlock ./genesis.block
configtxgen -profile MyChannel -channelID mychannel -outputCreateChannelTx ./mychannel.tx
kubectl create secret generic -n blockchain hlf-genesis -fromfile=genesis.block
kubectl create secret generic -n blockchain hlf-channel -fromfile=mychannel.tx
Fabric Orderer
After successfully setting up a fully functional Fabric CA, it’s time to move to the Orderer. Following are the steps involved in getting the Order running.
- Installing the Raft ordering service
- Setting up the Orderer Identity
- Saving the Orderer crypto-material on the Kubernetes
- Installing Fabric Orderer Helm Chart
Let’s discuss all these steps one by one:
Configuring the Raft cluster
Raft cluster configuration is required in two places:
Local configuration
Governs node-related aspects, including TLS communication, file storage, and replication behavior.
Channel configuration
Defines Raft cluster’s membership for the associated channel and protocol-specific parameters like heartbeat frequently, leader timeouts, etc.
Since each channel carries its own instance for running the Raft protocol, refer to the Raft node in the configuration of channels belonging to it. Add channel-specific server and client TLS certificates to the channel configuration for that. This action will ensure that when nodes receive messages from any channel, they can confirm the node’s identity of the node which sends the message.
See the below section from configtx.yaml that mentions three raft nodes in the channel:
Consenters:
            - Host: raft0.example.com
              Port: 7050
              ClientTLSCert: path/to/ClientTLSCert0
              ServerTLSCert: path/to/ServerTLSCert0
            - Host: raft1.example.com
              Port: 7050
              ClientTLSCert: path/to/ClientTLSCert1
              ServerTLSCert: path/to/ServerTLSCert1
            - Host: raft2.example.com
              Port: 7050
              ClientTLSCert: path/to/ClientTLSCert2
              ServerTLSCert: path/to/ServerTLSCert2
Once the channel configuration is completed, the configtx.yaml tools will read the paths for the TLS certificates and thus replace the paths of the corresponding bytes of the certificates.
Setting up the Orderer Identity
Now, you can set up the Orderer Identity. First, use kubectl exec to connect to the fabric-ca and register the identity of the order with a CA. Then, obtain the cryptographic materials to identify the Orderer by enrolling the Orderer. For this instance, we will put a dummy password “ord${NUM}_pw,” but in an actual deployment, it’s better to use a complex (e.g. alphanumeric of length at least 12) string instead.
Here, you will work with the first Orderer; if you want to install the second Orderer, change the initial export and set the NUM to 2 in the following command:
export NUM=1
kubectl exec $CA_POD -n blockchain  -- fabric-ca-client register -id.name ord${NUM} -id.secret ord${NUM}_pw -id.type orderer
FABRIC_CA_CLIENT_HOME=./config fabric-ca-client enroll -d -u https://ord${NUM}:ord${NUM}_pw@$CA_INGRESS -M ord${NUM}_MSP
Saving the Orderer crypto-material on the Kubernetes
After creating the crypto-material for the Orderer, you can store it in Kubernetes to use it while deploying the Helm chart. Below is the illustration of how to save the certificate and key of the Orderer.
NODE_CERT=$(ls ./config/ord_${NUM}_MSP/signcerts/*.pem)

kubectl create secret generic -n blockchain hlf-ord${NUM}-idcert -from-file=cert.pem=$NODE_CERT

NODE_KEY=$(ls ./config/ord_${NUM}_MSP/keystore/*_sk)

kubectl create secret generic -n blockchain hlf-ord${NUM}-idkey -from-file=key.pem=$NODE_KEY
Installing Fabric Orderer Helm Chart
You can now install the actual Orderers to check if they have initialized. Use the following command:
helm install stable/hlf-ord -n ord${NUM} -namespace blockchain -f./helm_values/ord${NUM}_values.yaml
ORD_POD=$(kubectl get pods -n blockchain -l "app=hlf-ord,release=ord${NUM}" -o jsonpath="{.items[0].metadata.name}")

kubectl logs -n blockchain $ORD_POD | grep 'completeInitialization'
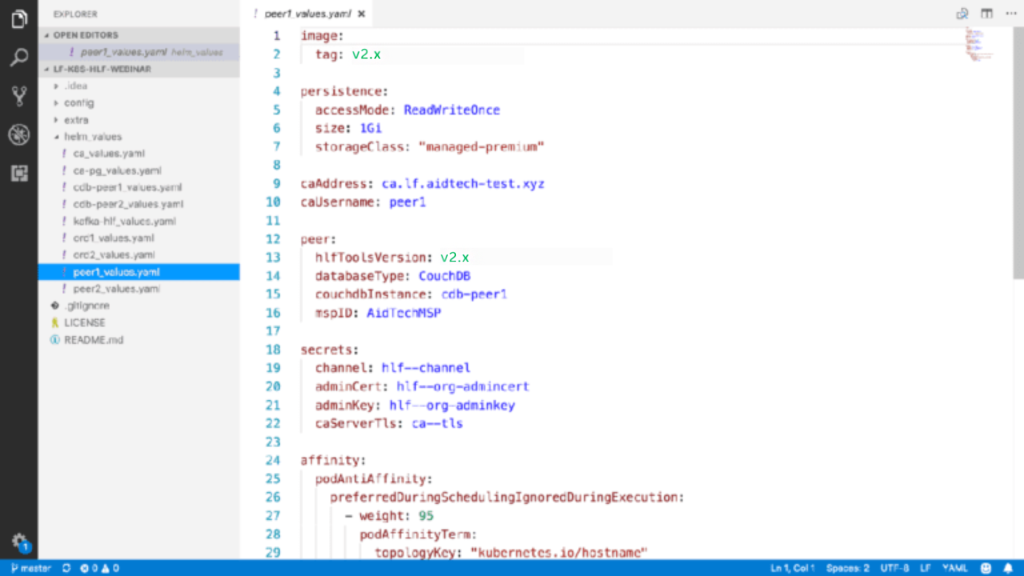
Also, define the consensus type, Raft Ordering service, and the MSP ID of the organization membership service provider. Finally, specify a set of secrets necessary to connect to the Certificate of Authority properly, such as the caServerTls secret, the genesis block secret (hlf–genesis in this example), and the admin certificate for the organization.
Then, you can use kubectl get pods to obtain the Orderer Pod and verify that the order has started by using kubectl logs while filtering for the string completeInitialization. This concludes the creation of a basic ordering service that uses Raft.
Fabric Peer
Finally, it’s time to install Fabric Peer, which maintains the entire block ledger. The installation involves the following multiple steps;
- Installing the CouchDB Helm Chart
- Setting up Peer Identity
- Saving the Peer crypto-material to Kubernetes
- Installing Fabric Peer Helm Chart
- Creating the Channel
- Fetching the Channel and joining it
Installing the CouchDB Helm Chart
The first step of installing the CouchDB database is similar to installing the PostgreSQL chart. After deployment, use the Kubernetes logs to ensure it is running.
The values file is straightforward in this instance, specifying the version of the Hyperledger carsDB, and it again specifies persistence so that the couchDB database holds the data and anti-affinity so that couchDB pods are deployed on different Kubernetes machines.
Setting up Peer Identity
Retrieve the CA_PASSWORD to set up the peer identity. It is a one-time password generated automatically by the chart. Next, register the peer with the certificate authority, as we did with the Orderer, specifying a different ID type (in this case, a peer). The peer will attempt to enroll with the CA periodically until it succeeds. Once it does, you will see the strings appear in the logs.
kubectl exec $CA_POD -n blockchain  -- fabric-ca-client register -id.name peer${NUM} -id.secret peer${NUM}_pw -id.type peer

FABRIC_CA_CLIENT_HOME=./config fabric-ca-client enroll -d -u https://peer${NUM}:peer${NUM}_pw@$CA_INGRESS -M peer${NUM}_MSP
Saving the Peer crypto-material to Kubernetes
Like the Orderer, save the crypto material for the Peer to the Kubernetes. Once again, save the certificate and the Peer’s key using the following command:
NODE_CERT=$(ls ./config/peer_${NUM}_MSP/signcerts/*.pem)

kubectl create secret generic -n blockchain hlf-peer${NUM}-idcert -from-file=cert.pem=$NODE_CERT
NODE_KEY=$(ls ./config/peer_${NUM}_MSP/keystore/*_sk)
kubectl create secret generic -n blockchain hlf-peer${NUM}-idkey -from-file=key.pem=$NODE_KEY
Installing the Fabric Peer Helm Chart
Now, install the Fabric Peer by running the following command:
helm install stable/hlf-peer -n peer${NUM} -namespace blockchain -f ./helm_values/peer${NUM}_values.yaml
PEER_POD=$(kubectl get pods -n blockchain -l "app=hlf-peer,release=peer${NUM}" -o jsonpath="{.items[0].metadata.name}")
kubectl logs -n blockchain $PEER_POD | grep 'Starting peer
The values file for the peer is similar to the Orderer values, as it mentions the ‘fabric-ca’ address and the peer username on the certificate authority. It also specifies that you are using CouchDB and the name of the CouchDB Helm deployment. Ensure that you note the secrets that we require, such as the ca-TLS secret, which you should communicate securely; the channel secret, specifying the channel transaction that will enable the peer to create and join channels; and the organization admin certificate key, which is also necessary to join the channel for asking permission to the network.
Creating channel
After you create the first peer, create the channel using the below command. For this, you will require the Orderer’s address, a relevant name for the channel, and a location for the channeled transaction.
kubectl exec -n blockchain $PEER_POD -- peer channel create -o ord1-hlford.
blockchain.svc.cluster.local:7050 -c mychannel -f/hl_config/channel/mychannel.tx
Fetching and joining the channel
Once you create the channel, fetch and join it on every Peer you have created. Do this by running the peer channel fetch config command inside the Peer. Then, run the peer channel join inside each peer container. Finally, run a peer channel list to verify if Peer has joined the channel.
kubectl exec -n blockchain $PEER_POD -- peer channel fetch
config /var/hyperledger/mychannel.block -c mychannel -o ord1-hlford.blockchain.svc.cluster.local:7050
kubectl exec -n blockchain $PEER_POD -- bash -c
'CORE_PEER_MSPCONFIGPATH=$ADMIN_MSP_PATH
peer channel join -b /var/hyperledger/mychannel.block'
kubectl exec -n blockchain $PEER_POD -- peer channel list
That’s done! If you’ve followed all the steps correctly, your Hyperledger network on Kubernetes will be deployed successfully. Leverage your network to run nodes, build dApps or customized web3 applications.
Shift to Fast Track, No-code Hyperledger Fabric Deployment with Zeeve
Zeeve offers a powerful Web3 infrastructure platform to deploy your Hyperledger Fabric nodes and network in minutes. Zeeve supports LTS versions 1.4x & the latest 2.2x to provide you with an updated infrastructure for Hyperledger Fabric nodes. As an enterprise-grade low-code Blockchain Infrastructure, Zeeve enables easy deployment, monitoring, and management of blockchain nodes and networks on public and Permissioned protocols.
Leveraging Zeeve’s no-code web3 stack, Enterprises, Blockchain Startups, Blockchain Consulting Companies, and web3 Developers can quickly deploy Blockchain nodes and Decentralised Apps, and manage them with 24*7 monitoring, advanced analytics and real- time alerts. To learn more about Zeeve, visit our Developer Center or join us on Twitter and Telegram.

