As an advanced and modular blockchain framework, Hyperledger Fabric is radically transforming the way businesses leverage enterprise blockchains and build their application-specific solutions. Considering this, we’ve already published a detailed guide on deploying a Hyperledger Fabric Node using the regular approach. However, the hassle-free and low-code way of deploying nodes is becoming popular as it is less time-consuming, easily manageable, and cost-efficient. This guide explains a hassle-free, no-code deployment of a Hyperledger Fabric node on Zeeve, including a quick cloud integration so that you can use your existing cloud setups for deployment. Basically, you can leverage Zeeve’s automated infrastructure deployment and meanwhile use any cloud of your choice for a more customized deployment of nodes. To enable this, the Zeeve platform offers a “Bring Your Own Cloud” or BYOC facility that allows users to deploy desired blockchain networks on the cloud of their preferences.
Understanding ‘BYOC’ and how does it help
BYOC is the acronym for ‘Bring your own cloud. BYOC is a cloud integration approach available on the Zeeve Platform to use your existing cloud setup for node deployment. You can choose your preferred cloud services from AWS, DigitalOcean, GCP, and Tencent Cloud. With BYOC, you can have full custody and ownership of data produced by nodes and services, which maintains security and compliance. This is highly relevant on Hyperledger Fabric as this blockchain is suitable for enterprise use cases, and we know that enterprises abide by strict data & security compliance. BYOC setup on Zeeve is quick and easy, as you will read in the next section. Further, if you do not already have a Cloud setup ready, you can opt for the Zeeve-managed cloud for both production-level and lower-level deployment.
How to deploy Hyperledger Fabric Node with BYOC via a Quick, Low-code approach
Following are the step-by-step instructions for no-code deployment of Hyperledger Fabric node on Zeeve with BYOC:
Cloud authentication
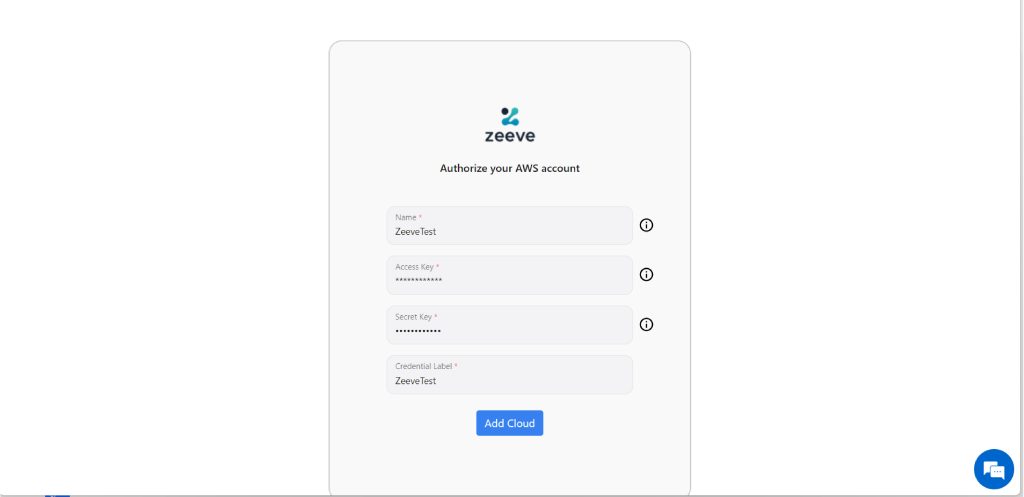
To deploy a Hyperledger Network with Zeeve, you need to log in to Zeeve Platform. If you are new, create an account first. Navigate to ‘Settings’ from the portal’s left navigation menu and click on “My Cloud.” You can add any account from the list- AWS, DigitalOcean, GCP- Google Cloud Platform, or Tencent Cloud (currently supported on Zeeve). For this guide, we will authenticate the AWS cloud. Hence, select AWS and click on ‘Add AWS Cloud.’
Important: You need the below permissions to authorize your AWS account on Zeeve and continue with the Hyperledger Fabric network deployment:
>Permissions to create VPC, Elastic IPs, EC2 instances, security groups, internet gateways, and route tables.
>With Fabric, you need additional permissions, including the ability to read and write EKS and CloudFormation resources and create and pass any IAM role.
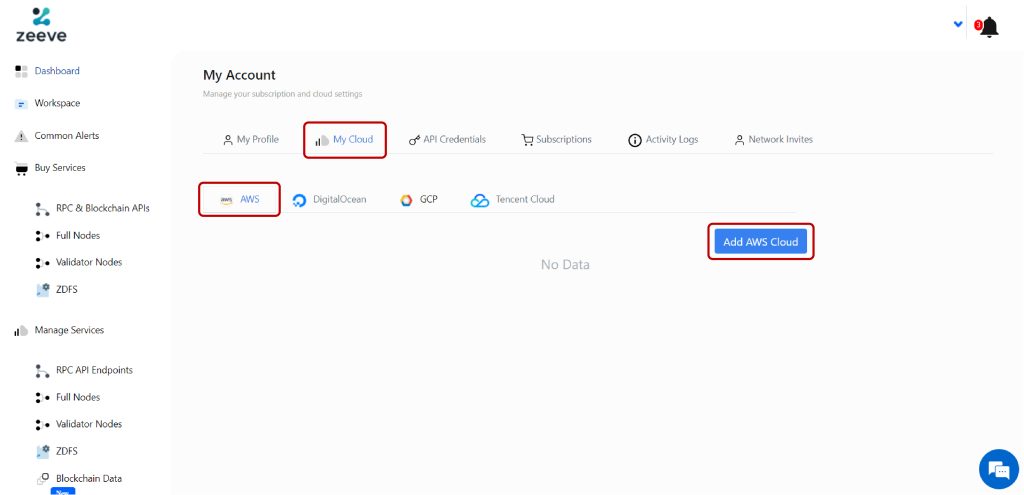
This action will open a popup screen asking you to provide the following credentials:
- Name- Unique name to identify your cloud account during network creation.
- Access Key- The key string generated for IAM (AWS Identity and Access Management) users.
- Secret Key- Secret key string generated for IAM users.
- Credential Label- Unique label for additional identification along with the name.
Creating Hyperledger Network
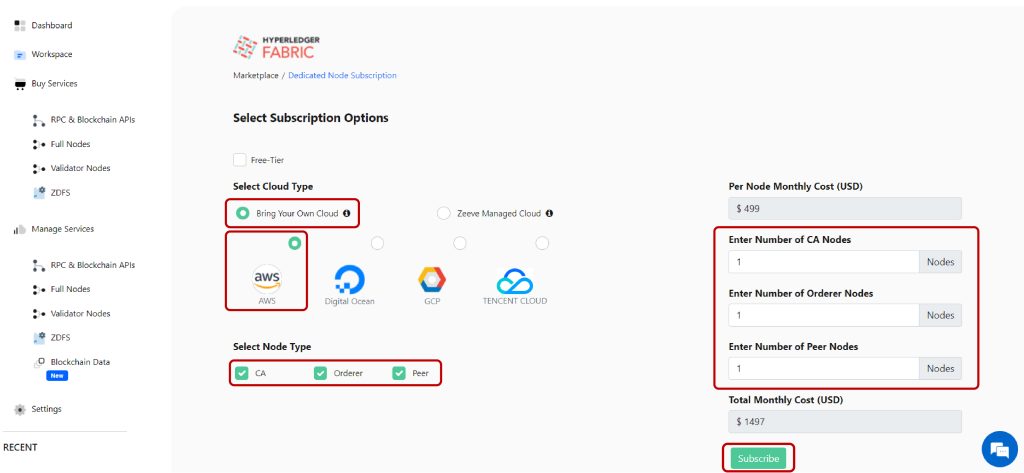
1.Visit the Zeeve dashboard, and navigate to the ‘Full Nodes’ under the ‘Buy Services’. Switch to Permissive Protocols and select Hyperledger Fabric from the list. A new page similar to the one below will appear. From here, you must add node-subscription details such as cloud type, select various nodes you want to deploy, and the total number of nodes. As we deploy an existing cloud, we selected ‘Bring Your Own Cloud’ and AWS. Also, we will deploy all three nodes- CA, Orderer, and Peer. Click on ‘Subscribe’ once you provide all the required details and complete the payment process. After that, your node subscription will be ready.
Another best thing about BYOC is that you can opt for “Free Tier” and enjoy a free trial period of 30 days. The Free Tier has three nodes- 1CA, 1 Orderer, and 1 Peer node and a maximum of three instances. During the trial period, you don’t need to pay anything and can upgrade or discontinue the subscription anytime.
Although deploying a Hyperledger Network with Zeeve is straightforward, you must know some essential deployment-related considerations that avoid complexities.
Want to learn about Hyperledger Fabric’s deployment considerations?
Read our guide on- Crucial Considerations Before Deploying Hyperledger Fabric in the Blockchain Network in 2023
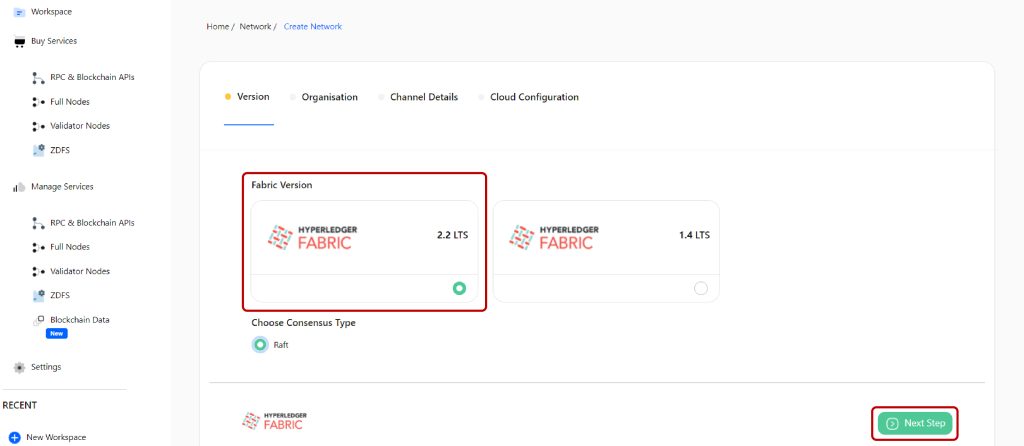
2. Go to “Manage Services’ —> Full Nodes and create a new Hyperledger Fabric network for you. A page similar to the below image will open where you need to provide some basic details related to your deployment, such as Fabric Version, Organization, Channel Details, and Cloud Configuration.
First, click on Version and select a suitable version like we have selected 2.2LTS. Also, Choose Consensus type, Raft, and proceed with ‘Next Step’.
Then, move to the Organization section and add the details for the three nodes – CA, Orderer1, and Peer1. As you can see in the given image, CA requires Name of the organization, Admin Username, Admin password. You can add more organization if required using the ‘Add Organization’ button. Also, you need to enable CA persistent volume and select volume size, which is set to 5GB by default on all the nodes. For the Orderer1 node, you must enable the Orderer persistent value and select the desired volume size. Peer1 node needs to enable Peer persistent volume, volume size, and embed the key-value state database in the peer process. Note that LevelDB is the default state; you can choose CouchDB as an external state database.
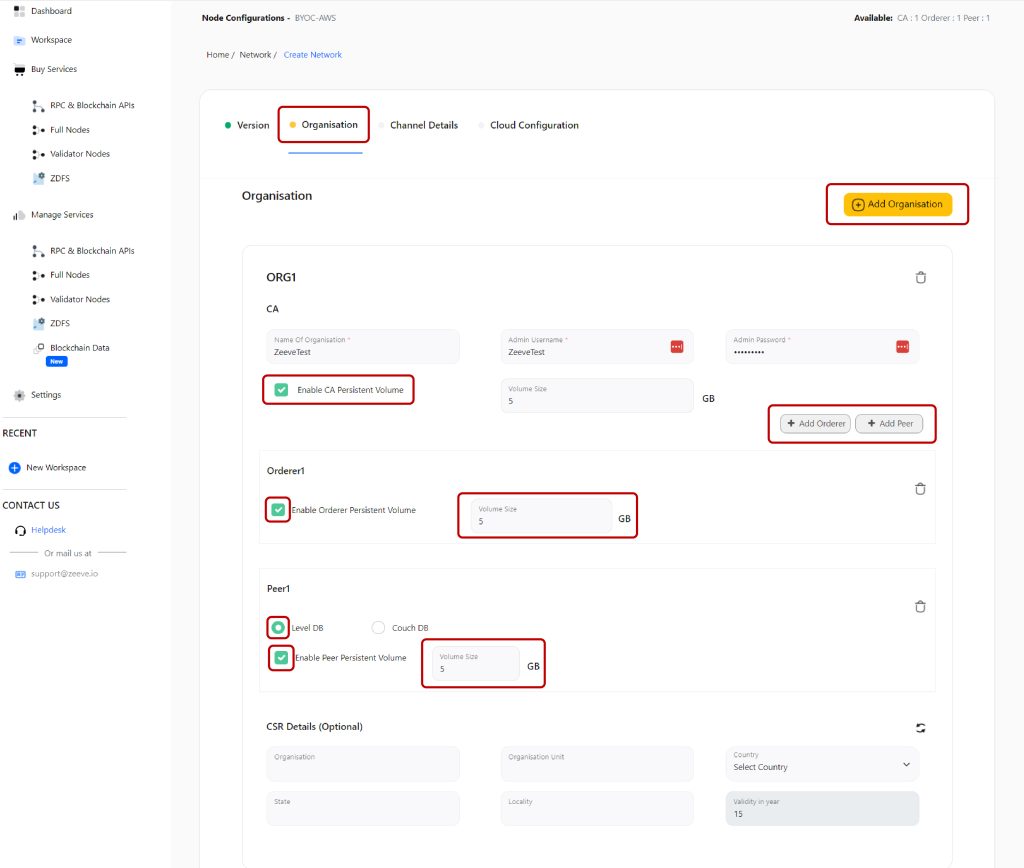
CSR or certificate signing request details are the information Zeeve requires to create certificates (certs) for your Hyperledger Fabric network. You need to provide details like Organization, unit, geographical details, etc. As these are optional, you can skip this section as well.
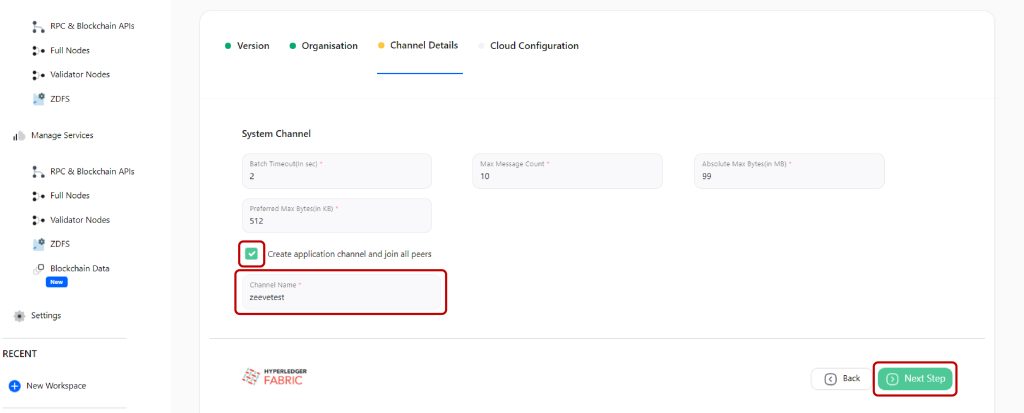
Next, Put channel-specific details such as Batch Timeout, Max message count, and absolute and preferred max bytes. This information is set by default; you can change them as required. Further, you can select the ‘Create application and join all peers’ option to create a peer channel with a unique name. This channel is a pathway between you and the members of the Hyperledger Fabric network to whom you wish to disclose a specific data set. While you can skip creating the channel, it is recommended to maintain confidentiality and privacy on your network. Proceed with the Next Step.
Complete the cloud configuration by adding the name of your network, selecting a relevant workspace, cloud account, region for your node, total number of instances, and lastly, the Instance Detail. You can choose any instance from the drop-down list corresponding to your network performance requirements, but each instance is associated with a different cost. So, make the decision wisely.
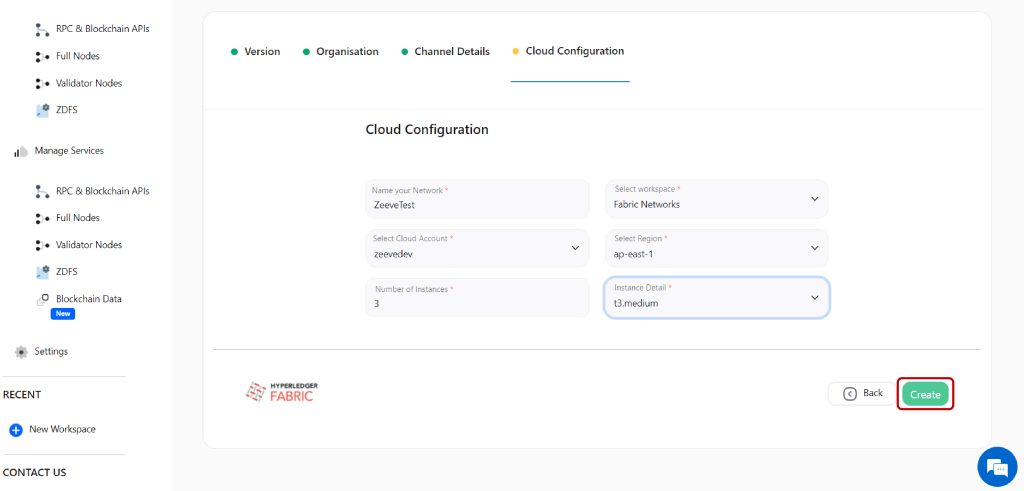
3. Click on ‘Create’ to bootstrap the network deployment.
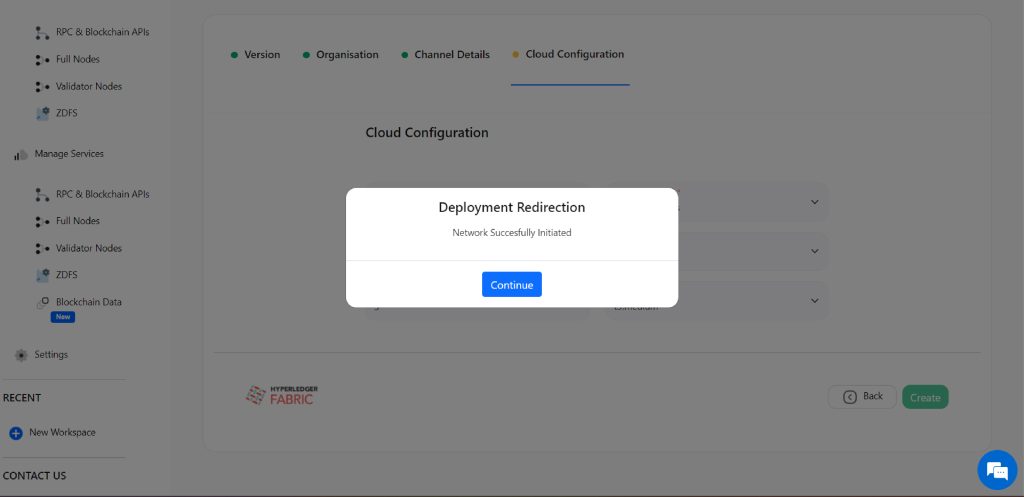
Wait a few minutes for your node to synchronize to the current block height. You will find the Fabric network across the list of networks under Managed Services.
That’s all! You have successfully deployed your Hyperledger Fabric Network with BYOC on Zeeve. Use this node to serve the desired purpose, including building your dApp, participating in the Hyperledger ecosystem, or building customized enterprise solutions.
Hyperledger Network Monitoring
Zeeve is committed to ensuring long-term user satisfaction, which continues even after your node is deployed, up, and running. We offer 24*7 resource monitoring and vital analytics to maintain the sound health of your nose while eliminating performance-related risks. For your Hyperledger node (CA, Orderer, and Peer), we provide instance and protocol-level monitoring to produce alerts, metrics, and logs. We also keep track of hardware and storage to avoid unnecessary load that slows down the network. All sorts of monitoring metrics, analytics, node details, and hardware information are presented on a unified graphical dashboard, as shown in the image below. Let’s understand how to access the dashboard and view analytics:
Once your node is synchronized, navigate to the Manage Services—-> Full Nodes and look for your Hyperledger Fabric network (for example, we created ‘ZeeveTest’). Click on the three vertical dots and select ‘View Network’.
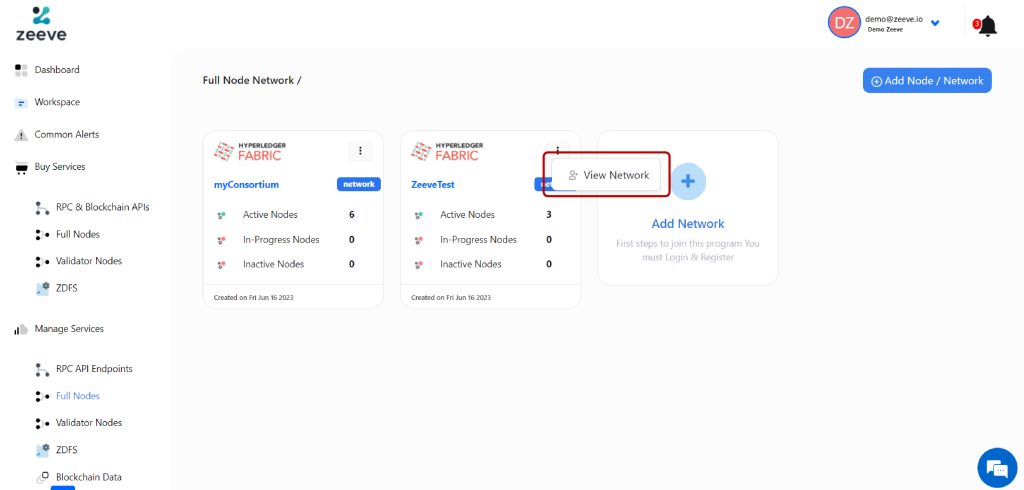
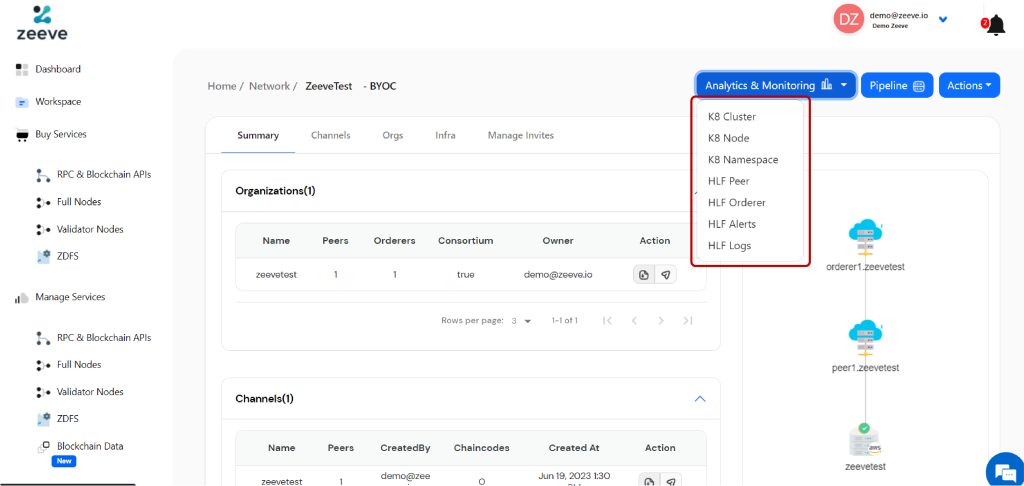
This action will redirect you to a separate dashboard like the image below. As you can see, it shows all the details related to your node. Additionally, you can see the “Analytics & Monitoring” tab in the top-right corner. The drop-down shows multiple parameters for monitoring your node on Zeeve’s web3 ecosystem.
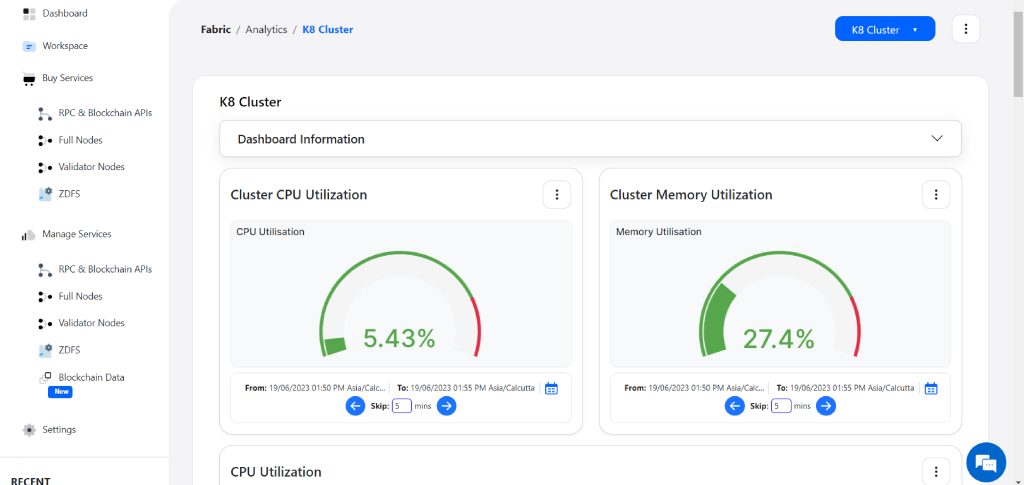
For example, if you click on the first parameter, K8 cluster, the dashboard shows the CPU and Memory Utilization of the Cluster.
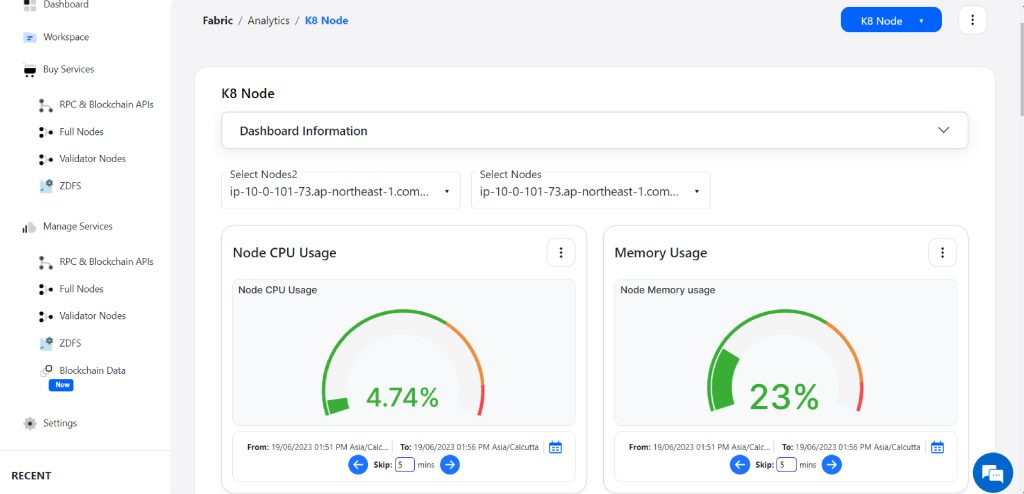
And if you select the next parameter, which is the K8 node, the dashboard shows the CPU and Memory Usage of the node.
Likewise, you can check each monitoring parameter to identify the health status of your node. However, Zeeve sends real-time and advance alerts on issues such as node downtime, functional issues, and excessive hardware usage. All these contribute to the high performance of your Fabric Network.
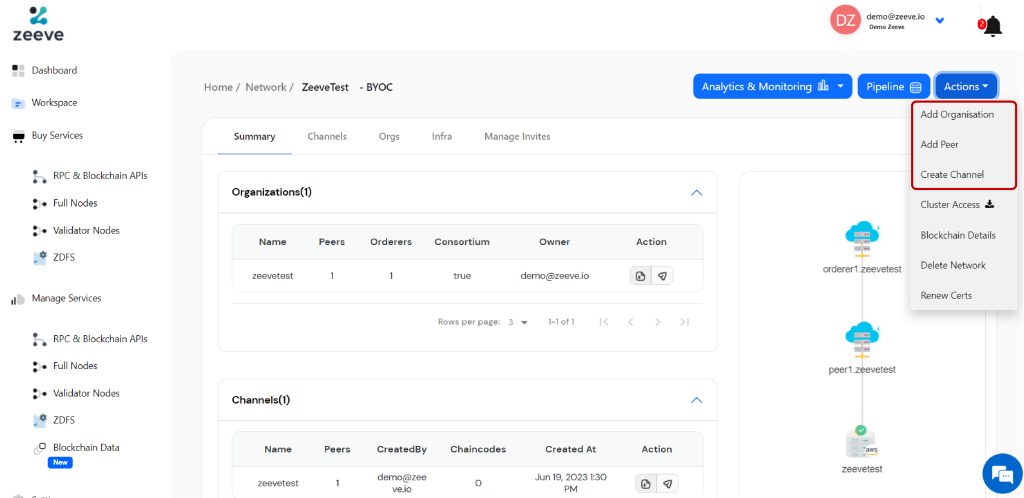
On the same dashboard, you can check the Pipeline actions (a tab next to the Analytics & Monitoring) listed with details such as pipeline status (completed, in progress, or failed), total jobs it includes, etc. The third tab- ‘Actions,’ allows you to perform certain actions such as adding more organizations, adding peers, creating the channel, deleting your network, and so on.
Conclusion
Bring Your Own Cloud (BYOC) is an innovative concept brought and offered solely by Zeeve; hence, you cannot get information anywhere else about this. Hopefully, this guide thoroughly explains the Deploying a Hyperledger Fabric Node on Zeeve with BYOC, the cloud authentication process for BYOC on Zeeve, and low-code node deployment with Zeeve. By following these instructions, you can quickly perform cloud integration, deploy your Hyperledger Fabric node, and start your blockchain journey. For any queries, you can directly contact our blockchain consultants through free consultation or join our network on Twitter, LinkedIn, and Telegram.


